

 by Tom Gurney
Tom Gurney BSc (Hons) is an art history expert with over 20 years experience
Page created on September 2, 2026 / Page updated on September 13, 2026
Email: tomgurney1@gmail.com / Phone: +44 7429 011000
A Figure Becomes Convincing When Weight, Balance and Structure Agree
Figure drawing represents the human body through observation, memory, copying or invention. Life drawing is the narrower practice of working from a living model. The two overlap, but historical figure studies were also made from earlier art, studio assistants, clothed sitters and designs developed across several sheets.
Since the Renaissance, drawing was treated in European academies as a foundation for painting, sculpture and architecture. Getty’s Learning to Draw exhibition shows a changing training culture from about 1550 to 1850 rather than one universal method: artists used study and practice to explore, invent and communicate visual ideas.[1] Today, the most useful foundations remain relational. Instead of forcing every body into a fixed formula, compare its actual proportions, locate support and weight, find the major masses, and decide whether line or tone best explains each turn.
This is a historical and practical introduction. It includes nude and clothed studies without treating either as the only serious form of figure drawing. Its sequence keeps gesture, pressure, contour and hatching distinct before combining them, following the useful separation in the National Gallery of Art’s drawing exercises.[10] Work with a model only in a setting with clear consent, agreed boundaries and respectful conduct.
At a Glance
- Begin with the actionFind the tilt, support and direction of the whole pose before describing anatomy or clothing.
- Compare, do not assumeMeasure one visible interval against another and use landmarks to test proportion on the page.
- Draw what perspective changesIn foreshortening, record the visible overlap and shortened interval rather than an imagined full length.
- Let contour and tone cooperateEdges establish placement while selected values explain turn, pressure and volume.
- Treat drapery as evidenceFolds reveal gravity, support points and the direction of the body beneath the cloth.
Contents
- Books for understanding figure drawing
- Choose the right figure-drawing decision
- Begin with the whole pose
- Proportion is comparison
- Landmarks before anatomy detail
- Foreshortening and visible intervals
- Drapery, body and gravity
- Group figures as one composition
- Build a figure-drawing session
- Watch figure drawing and close looking
Choose the Figure-Drawing Decision That Solves the Problem
A figure study becomes clearer when each kind of mark answers a visible question. Move between these decisions as the pose develops instead of treating them as a rigid sequence.
| Decision | What to observe | Useful action | Common failure |
|---|---|---|---|
| Action and balance | Main tilt, direction and the body's relationship to its support. | Place a simple action line and the bearing foot or seat before outlining limbs. | Drawing separate body parts without a coherent pose. |
| Proportion | Visible intervals between landmarks, not memorised ratios alone. | Compare head, torso and limb spans against one chosen unit. | Correcting local detail while the large relationships remain wrong. |
| Foreshortening | Overlap, width change and the compressed distance between landmarks. | Draw the near and far cross-sections before joining their contour. | Restoring the limb to its imagined full length. |
| Contour and tone | Where an edge is explicit and where value carries the turn. | Strengthen decisive overlaps and reserve broad tone for major planes. | Outlining everything equally or shading before the structure is secure. |
| Drapery | Support points, tension, compression and gravity. | Trace each important fold back to the body or object that causes it. | Copying wrinkles as surface decoration detached from the pose. |
| Multiple figures | Shared ground, scale, overlap and directional rhythm. | Block the group as one large shape before separating individuals. | Finishing one figure before testing the group composition. |
Begin with the whole pose
Before measuring fingers or features, identify the pose’s largest action. Mark the head, ribcage and pelvis as simple masses; connect them through the spine’s direction; then locate the supporting foot, seat or arm. Ask where the body’s weight would fall. A convincing figure can tolerate simplified anatomy, but not a support that contradicts its balance.
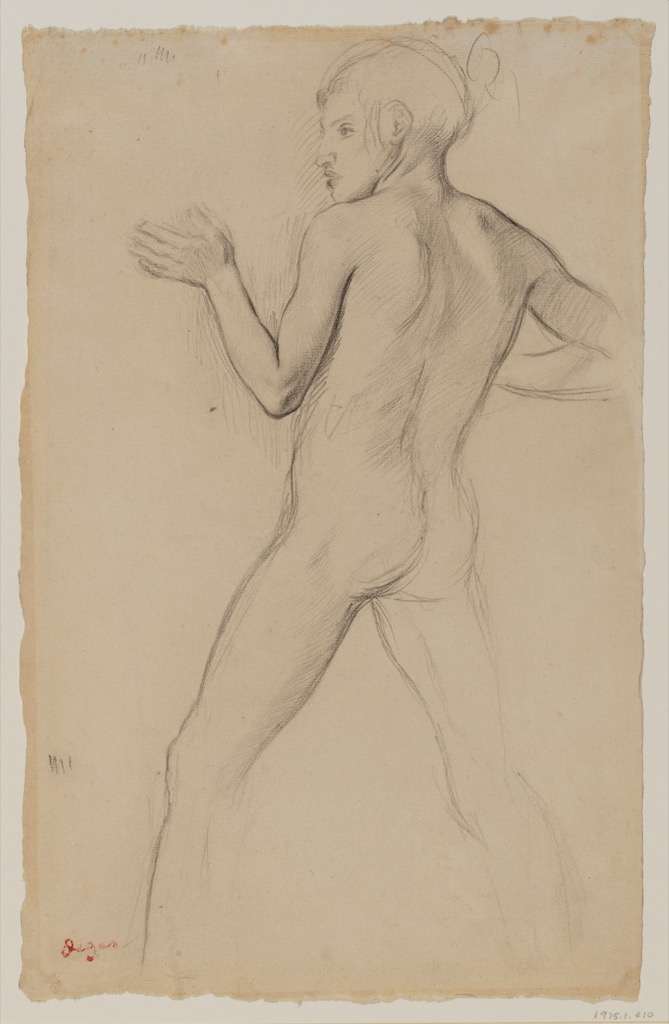
Edgar Degas’s Youth in an Attitude of Defense, 1859–60, was made in pencil on buff paper in relation to his long-developed painting Young Spartans Exercising.[2] The Met describes these posed studies as investigations of light and contour and as trials for transfer to canvas. The defensive action is not supplied by an outline alone: the relation of torso, planted legs and extended limbs creates readiness.
Make three two-minute studies of one pose. In the first, use only an action line and support points. In the second, add ribcage and pelvis as tilted masses. In the third, join those masses to the limbs. Do not add facial features. Place the drawings side by side and ask which loses balance first. The dedicated gesture drawing guide develops timed action further; here the exercise exists to secure the figure before detail.
Proportion is comparison
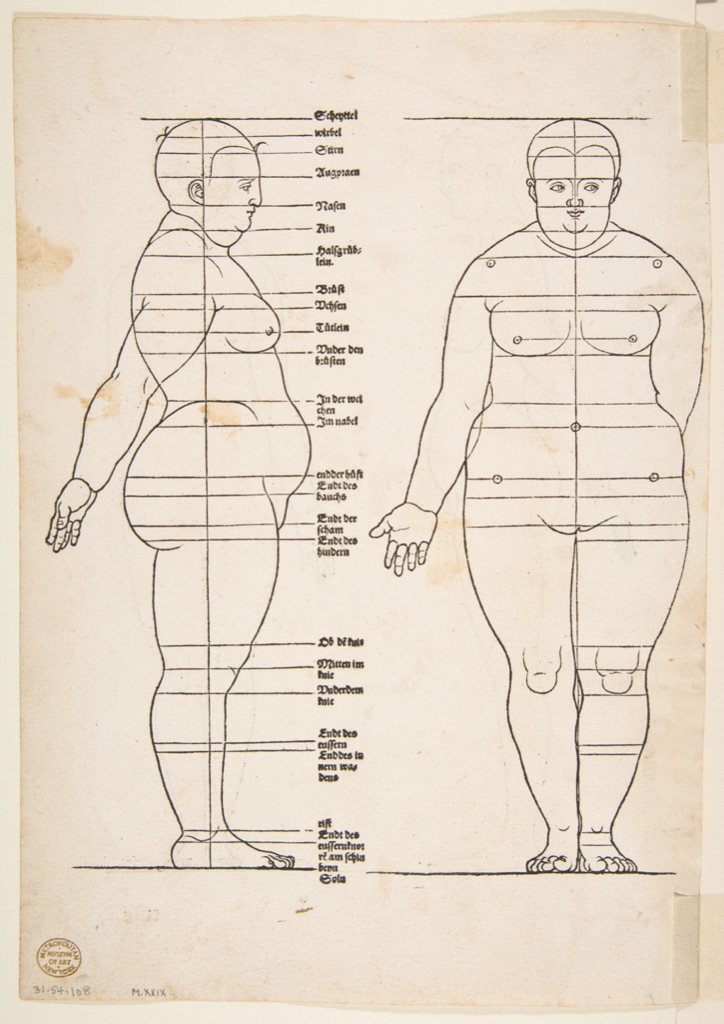
Rules such as “an adult is eight heads high” describe an idealised convention, not every body or viewpoint. Proportion is better treated as a network of observed ratios. Compare head to torso, shoulder width to hip width, and upper to lower limb. Check vertical alignments: where does the hand fall beside the thigh, and which part of the foot lies under the head?
Use a pencil held at arm’s length as a temporary measuring device, keeping your elbow locked so the scale remains consistent. Measure one unit, transfer it to other parts, and record deviations rather than correcting the model to match an average. Foreshortening changes apparent length: compare visible endpoints and overlaps instead of drawing what you know a limb contains.
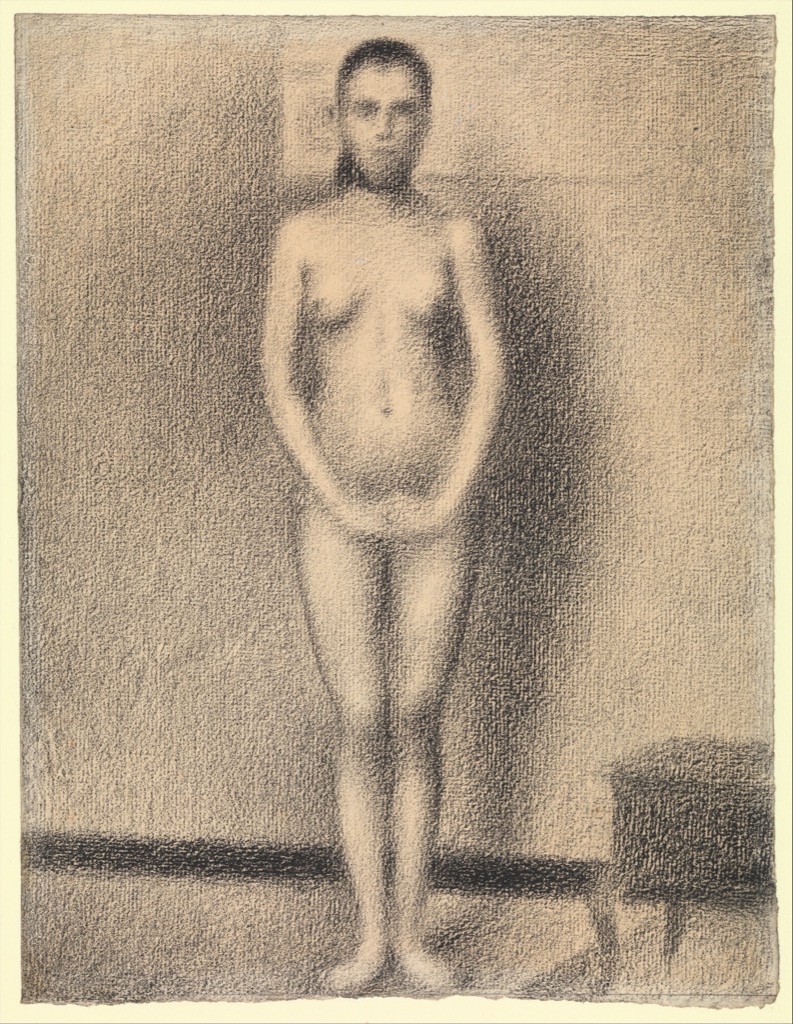
Georges Seurat’s Study for “Poseuses” identifies why an apparently awkward pose can be valuable.[3] The Met connects the standing model with a figure in the finished painting. Conté crayon turns the body into a compact tonal presence. The work does not beautify imbalance away; the sustained pose, weight and relative widths become design material.
To test your measurement, draw a standing pose for fifteen minutes and write three ratios in the margin. Halfway through, cover the drawing and measure the subject again. If the ratios change, determine whether the model shifted or your first comparison drifted. This turns proportion into recorded observation rather than correction by instinct.
Landmarks before anatomy detail
Anatomical knowledge helps when it explains a visible change. Begin with landmarks that can be located from the pose: the pit of the neck, lower edge of the ribcage, front points of the pelvis, elbow, kneecap, ankle and heel. Connect them through the large masses before naming individual muscles. A catalogue of muscles copied onto every sitter produces generic anatomy rather than observation.
Use paired landmarks to check tilt. If one shoulder is higher, compare the angle between them with the angle across the pelvis. Locate elbows relative to the ribcage and wrists relative to the pelvis rather than measuring each limb in isolation. On the back, follow the change of direction through spine, shoulder blades and pelvis; do not replace it with one rigid centre line.
Make a ten-minute landmark drawing using only dots and straight segments. Then place tracing paper over it and add the outer contour. Wherever the contour contradicts the landmark structure, return to the subject and decide which observation was wrong. This separates placement from surface detail and gives revision a clear cause.
Foreshortening: draw the visible interval
When a limb points towards you, its apparent length contracts and forms overlap. Knowledge that the forearm is “long” can interfere with what is actually visible. Measure the interval from elbow to wrist on the picture plane, compare widths, and notice which joint conceals the next. Cross-contours around a sleeve or limb help reveal its direction without restoring the missing length.
Set a hand or foot towards you and draw the nearest shape first. Add the next form only where it emerges. Check the negative spaces around the foreshortened part and draw one cross-contour at each major joint. Turn the page upside down during review; proportion errors become easier to see when the subject is temporarily less recognisable.
Degas’s defensive youth is useful here because projection, stance and transfer all matter. The drawing is not a diagram of ideal measurements. Its overlaps and tilted masses prepare a particular action for a larger composition. Let measured appearance override a memorised body chart.
Construction without wooden anatomy
Construction reduces complexity temporarily. The ribcage can be an egg-like volume, the pelvis a block or bowl, and limbs tapering cylinders. These are scaffolds, not things the body literally resembles. Their job is to preserve orientation and overlap until more specific contours replace them.
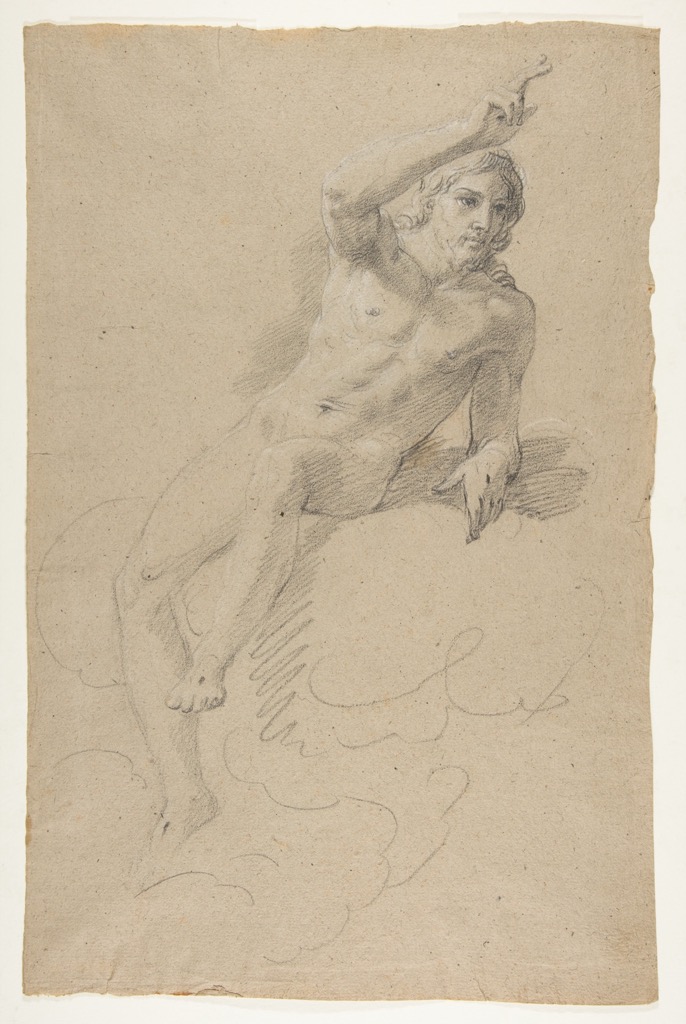
Giacomo Zoboli’s Christ Blessing uses black chalk heightened with white on grey-brown paper. The verso contains a faint study of the same figure and three studies for a left hand.[4] The repetition is instructive: a whole pose and a complex extremity can be solved at different scales. The middle-toned support lets black and white move around a shared value, strengthening volume without covering the sheet.
Draw a pose as three masses and four limb directions. Then isolate one hand at twice the scale. Return to the whole figure and add only the hand information that remains visible at that size. This prevents a detailed extremity from overpowering the body’s larger structure.
Drapery belongs to the body and gravity
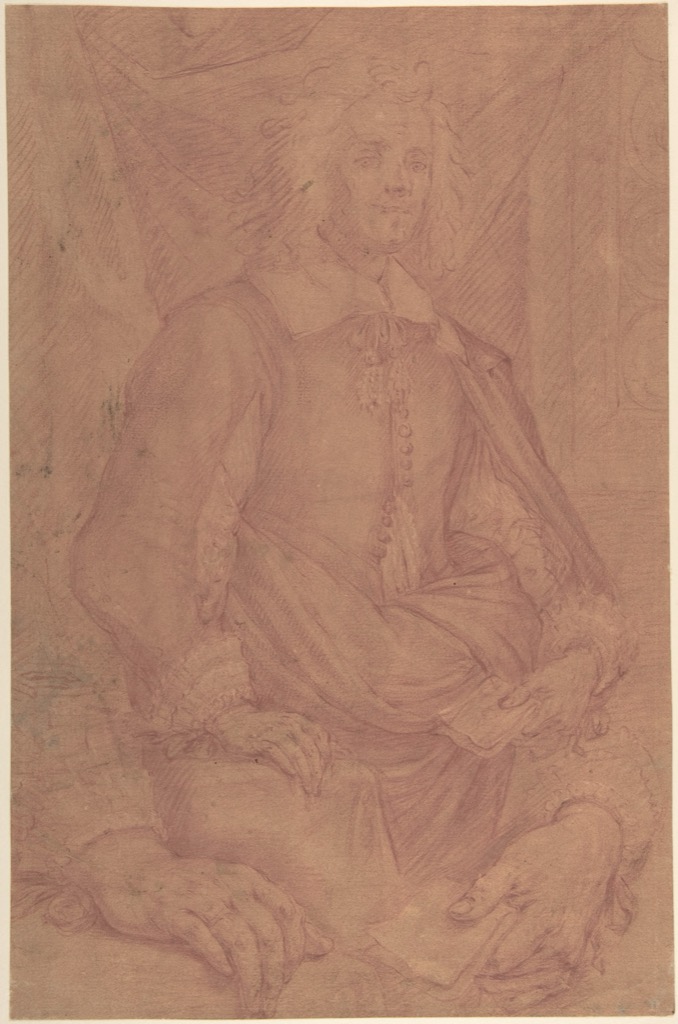
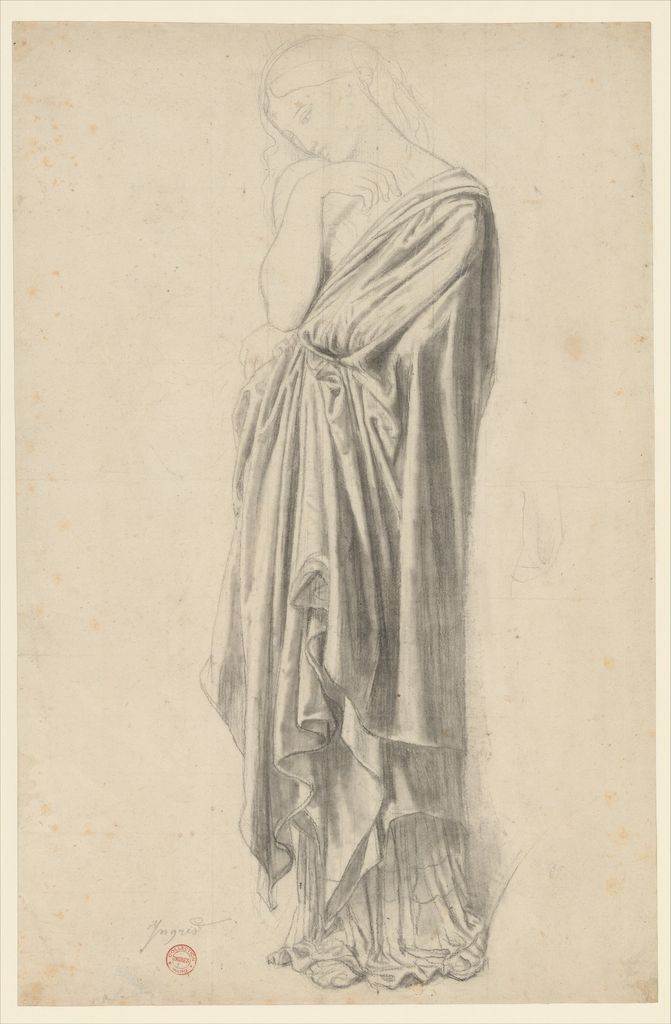
Clothing should not be drawn as a collection of unrelated zigzags. First locate where fabric is supported or pulled: shoulder, elbow, waist, knee or a point held by the hand. Folds radiate, hang or compress in response to those forces. Some describe the body beneath; others bridge across it.
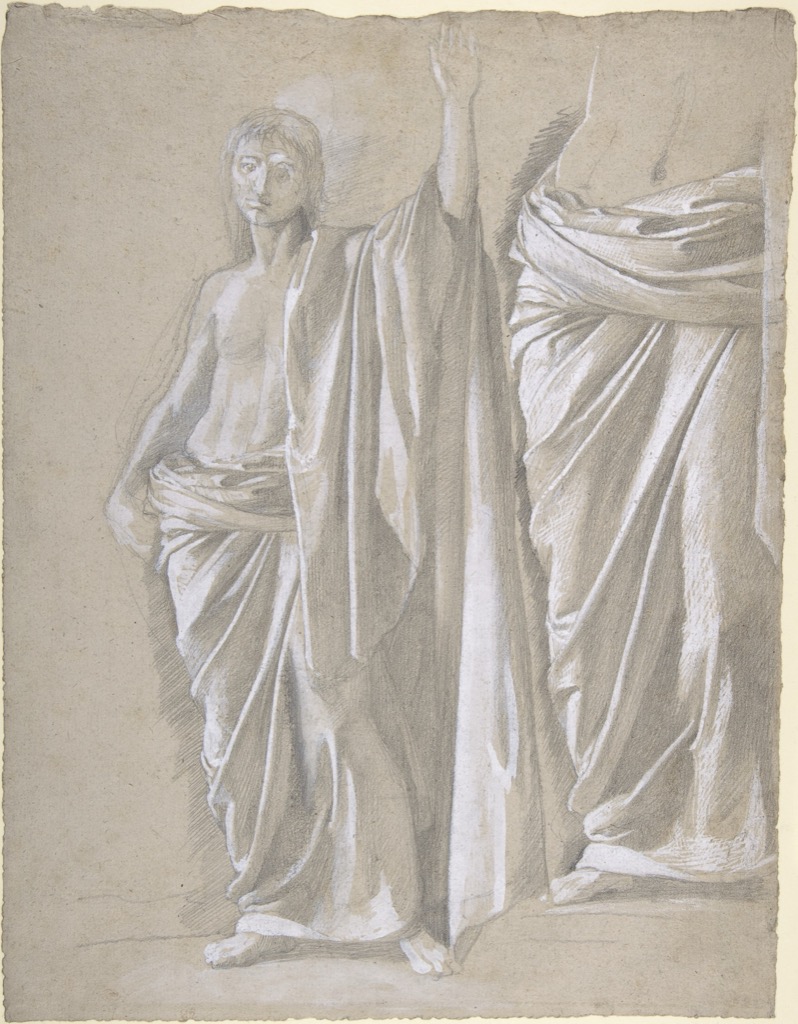
Degas’s Study of a Draped Figure, 1857–58, uses graphite heightened with white gouache.[5] The museum record does not identify a larger project, so its value here is visual and material rather than narrative. The drape’s light accents and graphite changes show how fabric can reveal the stance while retaining its own weight.
Mario Balassi’s Study for a Three-Quarter-Length Portrait of a Gentleman offers another clothed problem. Red chalk and white gouache work over a red-washed support; the verso holds a clothed figure and foot in black chalk with blue wash.[6] Cropping at three-quarter length changes the compositional emphasis. Hands, torso direction and the fall of clothing must carry presence when the lower legs are absent.
Practise with a coat hung over a chair before using a model. Mark five support points, then draw only folds that connect to one of them. On a second pass, add the chair or body masses that explain those supports. Remove any fold that contributes neither structure nor material character.
Use contour and tone together
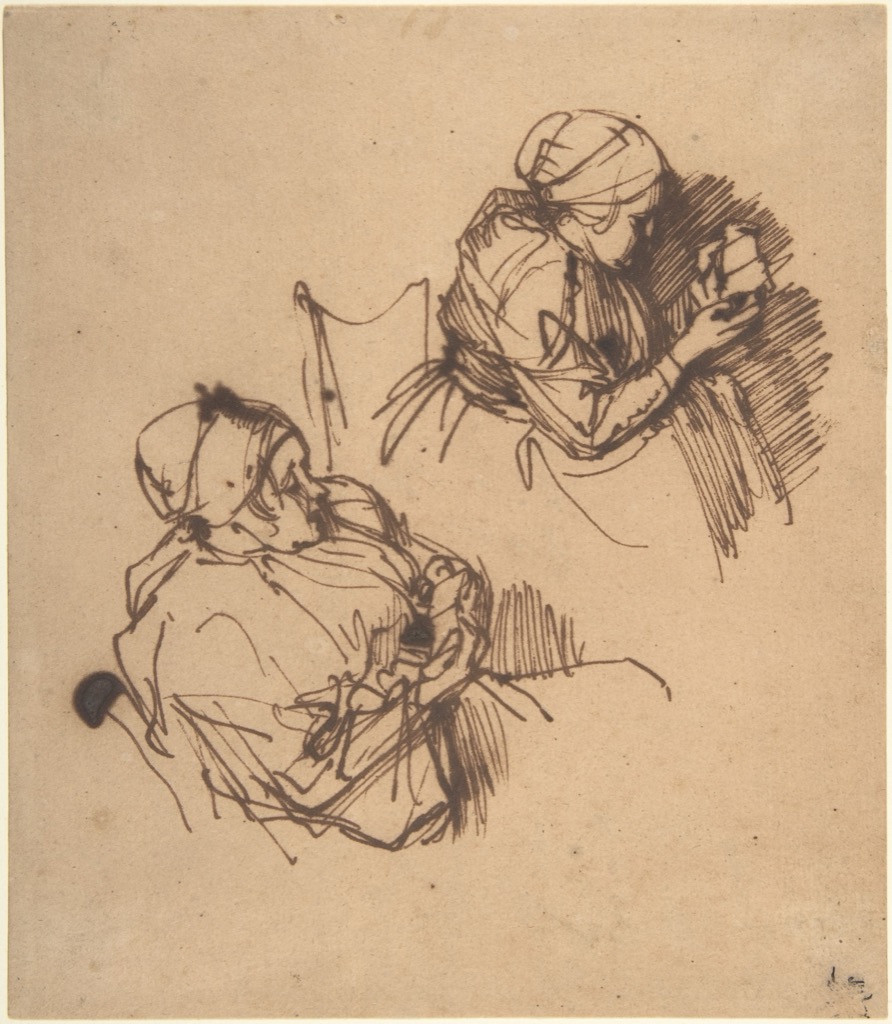
Contour clarifies silhouette, overlap and internal boundary. Tone turns planes through light and can allow some edges to disappear. A figure outlined equally from head to foot often looks cut out; a figure shaded without structural boundaries can become vague. Let the two systems divide the work.
Rembrandt’s Two Studies of a Woman Reading, 1635–40, uses pen and brown iron-gall ink.[7] The Met describes abbreviated but close observation: the curl of hair, fingers and cheek are summarised rather than exhaustively finished. The upper figure leans into darkness, described through strongly diverging hatching, while the lower receives fuller light. Rembrandt’s wife Saskia may have served as model, but the identification remains qualified.[7]
Draw the same seated pose twice. In one version, permit only weighted contour and five interior lines. In the other, use four value masses and no enclosing outline. A third short study may combine the strongest information from both. The exercise reveals whether you habitually use line where value would explain the form more directly.
Group figures as one composition
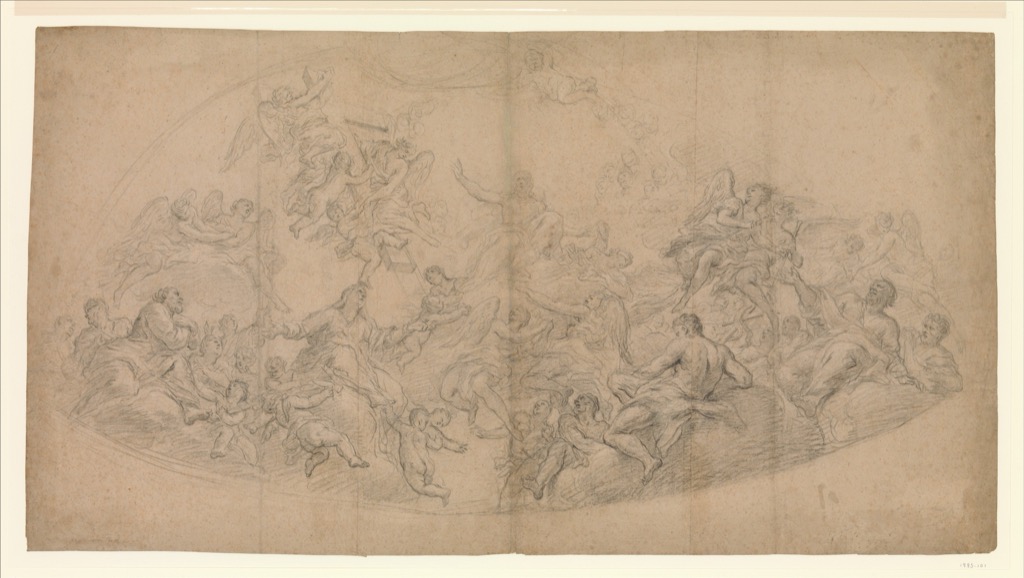
Multiple figures should first read as a single arrangement of masses and intervals. Identify the group’s combined silhouette, the largest gaps between bodies and a dominant diagonal or curve. Only then separate individuals. This prevents a row of correctly proportioned figures from feeling unrelated.
Antonio Puglieschi’s Exaltation of the Holy Cross of 1700 is a broad charcoal composition with traces of white on beige paper.[8] The Met record establishes its material, date and title but does not provide an extended interpretation. Visually, the spread of light and dark groups is enough to demonstrate that a multi-figure drawing needs large organisation before faces or anatomy.
Reduce a group photograph or observed scene to three connected dark masses. Add no more than five directional strokes for limbs or staffs. Next, cut three small pieces of paper matching the principal gaps and place them over the drawing. If the negative spaces are monotonous or accidental, revise the group before adding individuals.
A clothed portrait is still figure drawing
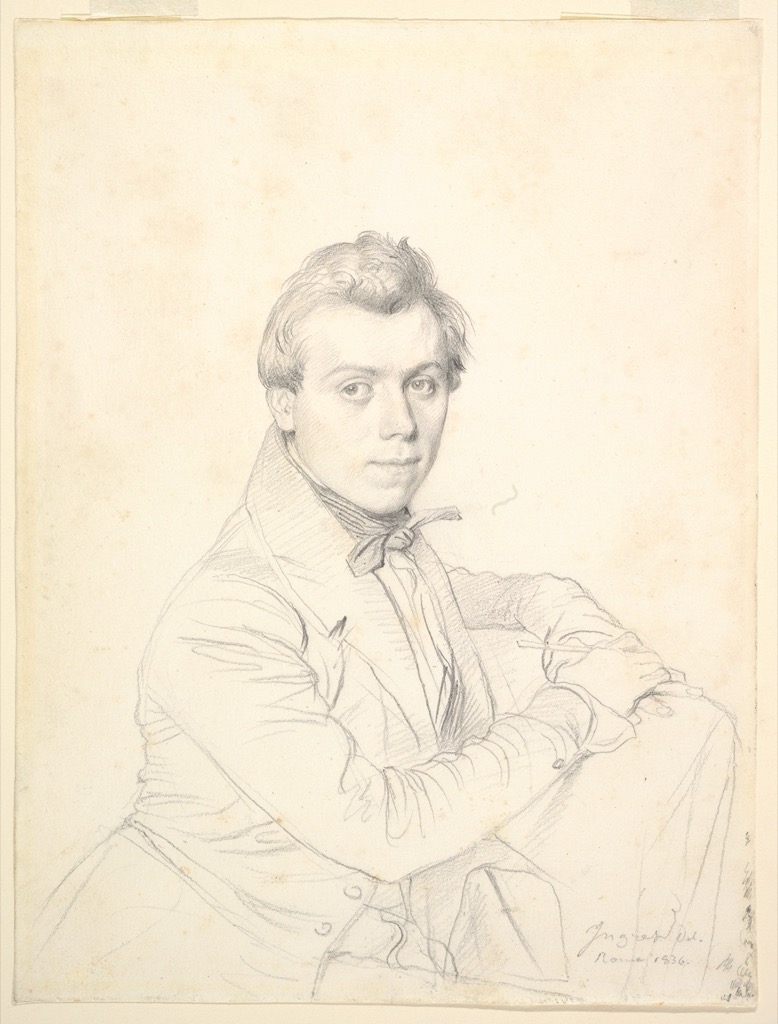
Figure drawing is not limited to the nude academy model. Clothing, occupation, posture and relation to the page can be central bodily evidence. Ingres’s graphite portrait The Architect Charles-Victor Famin was made in 1836, when Famin was a newly arrived architecture student at the French Academy in Rome.[9] The Met describes the drawing as an informal gesture of friendship. Famin holds a drafting pencil, but the portrait’s economy avoids turning that attribute into theatrical costume.
Begin a clothed portrait by drawing the tilt of head and shoulders, the sitter’s support and the largest garment silhouette. Leave the face blank until those relationships feel specific. Add one occupational or personal attribute only after the pose works without it. The test is whether the body conveys attention, reserve, fatigue or ease before a viewer reads the accessory.
Build a figure-drawing session
A coherent session moves from broad decisions to sustained observation. Start with four one-minute action studies, then two five-minute constructed poses, then one twenty-minute drawing focused on contour and value. End with a separate study of the most difficult hand, foot or drapery junction. Keep the short drawings; they record decisions the long one may bury.
Use one goal per session. “Draw better figures” is too vague. Choose “locate the support before limbs”, “measure three ratios twice”, or “lose half the lit contour”. Review the pages against that constraint. Accuracy, expression and material handling grow through specific comparisons rather than a single perfect drawing.
Review from large to small. First ask whether the figure stands, sits or leans believably. Second compare the main masses and negative spaces. Third inspect overlaps, joints and the distribution of light. Only then consider facial features, fingers or surface finish. Write one observation and one next experiment on the back; a critique is useful when it leads to a bounded change.
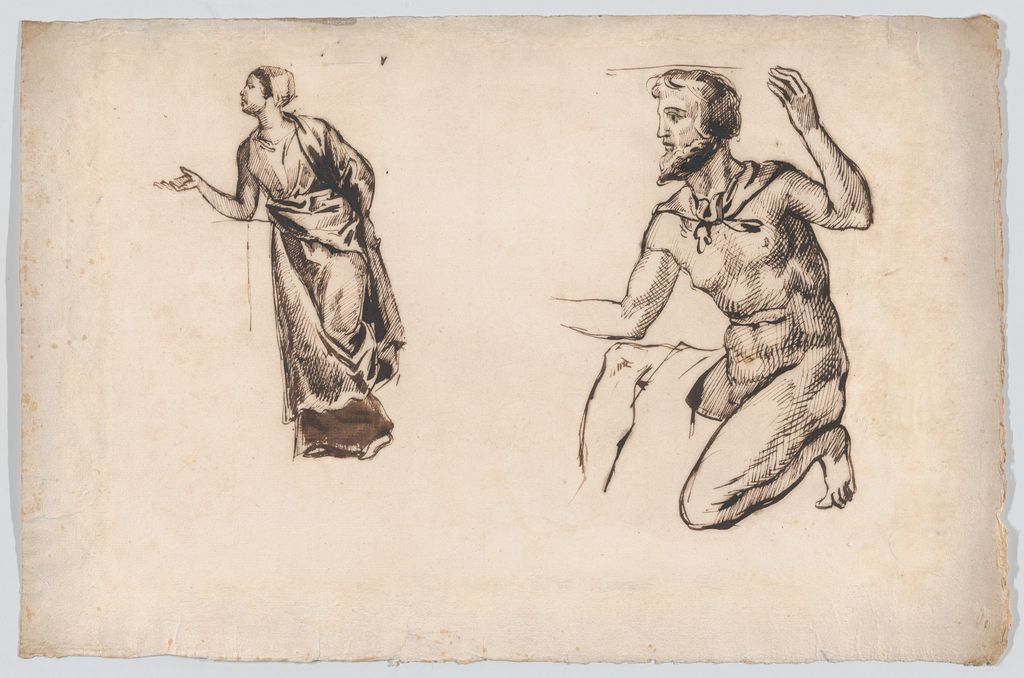
The historic sheets here also resist a simple ladder from rough to finished. Degas used a posed youth for transfer and made an independent drapery study. Seurat developed a figure for a major composition through dense tone. Rembrandt compressed two lighting situations on one page. Zoboli repeated a hand. Balassi studied clothed pose and crop. Puglieschi organised a crowd. Ingres made an informal portrait. Figure drawing is a family of purposes joined by sustained attention to the body.
For edges and overlaps, use contour drawing; for materials, see drawing mediums. The existing historical gallery below has been retained from the earlier page so its successful collection and URLs remain available alongside this sourced replacement.
Watch Curators and Artists Read the Human Figure
Choose a Royal Collection account of Leonardo's anatomical inquiry, a curator-led reading of Sargent's charcoal portraits or a museum studio demonstration of building and revising a drawing.
Leonardo da Vinci: Anatomist
A Royal Collection curator explains how Leonardo used drawing to investigate bodily structure rather than merely decorate an outline.
Watch on YouTubeFrequently Asked Questions
Figure drawing is the practice of observing and representing the human body, clothed or unclothed, with attention to pose, proportion, weight, structure, contour, value and movement.
Begin with the pose's large direction and support: the main action, tilt of the torso and pelvis, bearing foot or seated contact. Add landmarks and proportions before small anatomy.
Anatomy helps when it explains a visible change of plane, joint or movement, but it should support observation rather than replace it with a memorised diagram.
Compare the visible distance between landmarks, look for overlap and width change, and resist restoring the limb to the longer shape you know it has.
Yes. Clothing does not remove the body's balance, volume or gesture. Folds can reveal support, tension and the direction of the form underneath.
Discussion
Which historical study becomes clearer when you first identify its support, largest tilt and strongest overlap rather than its most finished detail?
Reader Insights
A standing or seated body becomes convincing when its mass visibly resolves into a foot, chair or other contact.
Shoulders, pelvis, joints and the pit of the neck help test relationships before surface anatomy takes over.
The most useful folds point back to gravity, tension, compression and the body beneath them.
Join the Conversation
Share one figure study in which correcting balance, landmark spacing or an overlap changed the whole pose.
References
- J. Paul Getty Museum, “Learning to Draw”: source.
- The Metropolitan Museum of Art, Edgar Degas, Youth in an Attitude of Defense, 1975.1.610: source.
- The Metropolitan Museum of Art, Georges Seurat, Study for “Poseuses”: source.
- The Metropolitan Museum of Art, Giacomo Zoboli, Christ Blessing, 1986.36: source.
- The Metropolitan Museum of Art, Edgar Degas, Study of a Draped Figure, 1975.5: source.
- The Metropolitan Museum of Art, Mario Balassi, Study for a Three-Quarter-Length Portrait of a Gentleman: source.
- The Metropolitan Museum of Art, Rembrandt, Two Studies of a Woman Reading, 29.100.932: source.
- The Metropolitan Museum of Art, Antonio Puglieschi, Exaltation of the Holy Cross, 1985.101: source.
- The Metropolitan Museum of Art, Jean-Auguste-Dominique Ingres, The Architect Charles-Victor Famin, 2012.150.15: source.
- National Gallery of Art, “Drawing Everyday Objects”: source.